Editing files
So far we’ve been using $COPY *SOURCE* file to create text files - for more complex editing we need to get to grips with the MTS editor. This post will give a quick introduction focusing on the visual editing mode.
Coming from a Unix or Windows background, the MTS editor will use an unfamiliar set of keys but once you learn them it is easy to use. There are some interesting features such as an integrated, editable copy and paste/command execution area, and the ability to remember locations and jump to them quickly.
Starting up and exiting
Enter $EDIT gamma to start editing file gamma. Remember you have to $CREATE the file in MTS if it does not exist already.
Initially you will be in command mode with a : prompt; type VISUAL or just V to enter visual mode.
Hit PA2 to get out of visual mode and PA2 again to quit the editor and get back to the MTS command line.
The editor makes heavy use of the PF function keys so check with your 3270 terminal emulator documentation on how to access these. Often they are bound to PC function keys, ie PF1 can be issued by pressing F1.
Screen arrangement
On entering visual mode for a new file the screen will look like this:
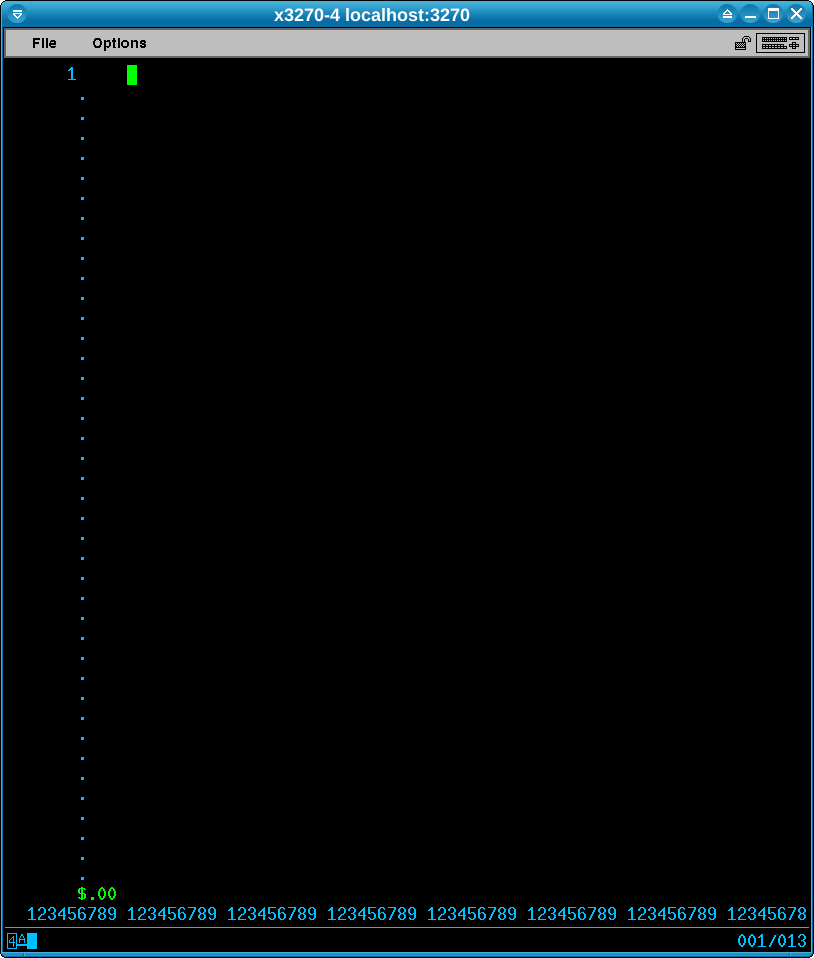
The bottom line shows a ruler and the last but one line shows the cost of the edit session (not applicable on Hercules of course) and the work field, used to hold copied text and enter commands. The rest of the screen is used to view and edit text.
Entering text
You can start typing text immediately. The cursor keys allow you to move back and forth in the line; the delete and backspace keys work as expected also.
Insert will switch to overwrite mode; on my emulator at least I find I need to press Enter to switch it off.
Press Newline to start a new line; the line number will not be displayed immediately. Press Enter to ask the editor to refresh the screen and set the line number.
Tab will move to the start of the next line; Backtab will move to the start of the current line if in the middle of a line, else the previous line.
If you move the cursor down a number of lines and start typing then press Enter, the line number given will reflect the gap and the text will move up so no gap is displayed.
Scrolling around
For documents larger than one screen, press PF1 to scroll up one page and PF4 to scroll down. PF7 will scroll down one line. HOME will move to the top of the window.
Moving the cursor up from the top of the screen or down from the bottom will not scroll; instead the cursor will wrap around to the bottom or top.
The editor can remember your location in the file and return to it after you have moved. To set memory location 1, press PF3 two times in a row. After you have moved, press PF3 once to return to that location. PF6 and PF9 can be used similarly to set and return to memory locations 2 and 3. Initially the memory locations are defined as:
- Memory 1 - first line of file
- Memory 2 - line 1000 of file
- Memory 3 - last line of file
Copy and paste and the work field
A form of copy and paste is done using the work field at the bottom of the screen. Press PF2 to copy from the cursor to the end of the line to the work field. Press PF5 to paste the contents of the work field at the cursor position.
You can jump to the work area with SysReq and edit what’s there to control what is pasted..
You can also enter line-orientated commands in the work area and execute them with PF8.
Note that instead of using this you can use the native functions provided by your host operating system to copy and paste.
Insert and delete lines
EraseEOF will delete the rest of the line or the whole line if the cursor is at the start of a line.
PF10 will insert a new line below the current line. Repeatedly pressing it will insert 2x the number of blank lines each time, so press twice for two lines, three times for four lines, four times for eight lines and so on.
There is no predefined key to split a line into two. To do this, type VSPLIT into the work area. Move the cursor back to the place you want to split and press PF8 to execute the split command.
Line numbering
The editor will handle line numbers. If you have line 1 and line 2 entered but want to add a line in between (by pressing PF10) it will use line number 1.5. Remember you can use the $RENUMBER command back at the MTS command prompt to turn an uneven sequence of lines into 1, 2, 3 etc.
Line extensions
When you reach the right end of the screen while typing a line the editor will not let you continue. Press PF11 to extend the line onto the next row of the screen and you can keep typing.
Saving and undo
There is no explicit save command - the file is saved back to disk when the screen is refreshed (eg on scrolling or with Enter) or when you exit visual mode. Because of this it is a good idea to make a backup of important files before you start editing them.
It is possible to undo all changes done in the current editing session. Switch back to command line mode (with PA2) and type UNDO at the : prompt.
Summary of PF keys
PF1Scroll up ten linesPF2Append rest of line to work areaPF3Memory 1PF4Scroll down ten linesPF5Insert contents of work area in current linePF6Memory 2PF7Scroll up one linePF8Executes contents of work area as commandPF9Memory 3PF10Insert linePF11Extend current linePF12Move to the previous position
Command mode
The editor also contains a rich command mode which I will not go into in depth here. Some simple examples:
: PRINT
Print the current line
: +1
Move forwards one line
: ALTER 'aa'bb'
Find the first occurrence on the current line of aa and replace with bb
: ALTER@ALL 'cc'dd'
Replace all occurrences of cc with dd on the current line
: ALTER@ALL /FILE 'ee'ff'
Replace all occurrences of ee with ff in the whole file~
More information
See MTS Volume 18, The MTS File Editor for complete documentation; also look at the online help by typing HELP from the editor command mode prompt.